 Put
Your Web Site Online
Put
Your Web Site Online
1. Get
a Tripod.Lycos Account
- Get a Tripod Account by going to https://www.tripod.com/
and click on SIGN UP button at the very top.
- Scroll down to the bottom of page and click on the "Sign Up" link
in the left hand column. This should be for those who want to "Try Tripod
for FREE!"
- Fill in the form. The first text box asks for your "Member Name".
This will become part of your URL. For example, I chose "burpquest"
and my URL is now http://burpquest.tripod.com/. I recommend that you deselect
the checked boxes at the bottom of the form unless you want more spam type
email. Press "I Agree" when you are completed with the form. If
you are missing information, or someone already has the member name you selected,
add the information or change the member name and click on "I Agree"
again.
- Step 2: Confirmation - is the next step. Click on "Activate your account
and start building!"
2. Define
the Site in Dreamweaver and Upload Your Files
A. Define Local Info See
figure 1.
Locate your main web pages folder. Make sure this folder has the first
page of your site - index.html.
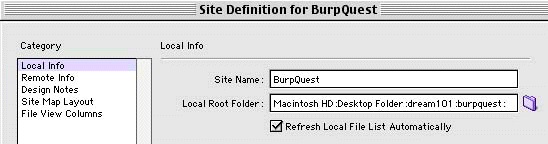
figure 1
- Select Site > Define Sites.
- Click on New.
- Type BurpQuest in the Site Name window.
- Click on the folder icon to the far right of the Local
Root Folder window.
- Navigate to your IT Classes Folder and only click once on
the burpquest folder. Select the Choose button.
B.
Define Remote Info See
figure 2.
Locate
your internet site using FTP (File Transfer Protocol). This is so you can transfer
files there.
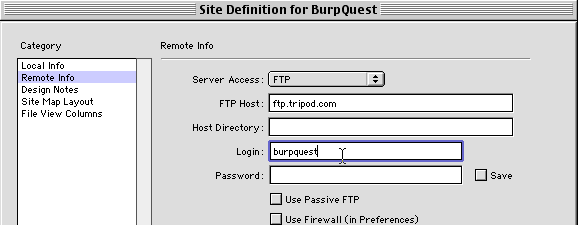
figure 2
- Click on the Remote Info option on the left. Choose
FTP in the Server Access Options.
- In the FTP Host window type ftp.tripod.com.
- In the Login window type burpquest.
C. Uploading
Files to the Internet
- The BurpQuest Site palette appears on the screen. The left
side of the palette has the files located at our Remote Site (Tripod). The
right side has all the files we have in our Local Site folder (MacLab Server
or Desktop).
- Press the button in the middle of the keyboard that connects
to the remote site.
 If
you hold your mouse over the button, it should say "Connects to Remote
Host." After you press this button, type in your yahoo password.
Click OK.
If
you hold your mouse over the button, it should say "Connects to Remote
Host." After you press this button, type in your yahoo password.
Click OK.
- If Tripod is not too busy, you will connect and you will
see a cgi-bin folder on the Remote Site.
- Click on index.html and click on the blue up arrow
(Put Files) to upload the file to the Remote Site. Click Yes
to include dependent files. The index.html file and the images
folder are both placed on the Remote Site.
- Click on begin.html and click on Put (blue
arrow) to put that file on the Internet. Click Yes.
- Open a browser and surf to http://burpquest.tripod.com/
to view this site.
** If necessessary: Uploading Files Using Tripod's File
Manager
- If some of your files won't load using Dreamweaver, you can upload them
the old fashioned way using the File Manager. To do this, go to http://www.tripod.com
and click on the "LOG IN" button at the top and type in your Member
Name and Password.
- Place your cursor over the "BUILD & EDIT" button at the top
to get the scroll down menu to appear. Scroll down and select "File Manager".
- Note where it says "Account status: 0 mb used 20 mb remaining."
That means I have a lot of space left for my web page. Just above the Account
status information is a small box that says "Upload via". Click
on the arrow to the right of that box and choose "single files (8)"
if you want to start uploading your files. This will allow you to put from
one to eight files up to your site at a time. In the File 1: box click on
the Browse button and locate your first file. Then select the Browse button
next to File 2: and so on. When you are ready to upload, scroll down to the
bottom of the page and click on the "Upload" button.
- Note: If you have your images in a folder called images, don't just upload
your images to the main directory. Use the "Move" button first to
move to your images folder first, then upload your images. If you don't have
an images folder created yet, select the "New Directory" button
and type "images" without the quotes and then select "Create".
For more help, see the tripod
links below:
File Manager: http://r.lycos.com/r/TRACKER-ID/http://build.tripod.lycos.com/hpstudio/filemanager/index.jsp
FTP: http://r.lycos.com/r/TRACKER-ID/https://www.tripod.lycos.com/guides/ftp.html
